Appium for Python
This is a tutorial that will help you set up Percy for visually testing your native apps with Appium and Python.
Example app used by the Python Appium tutorial demonstrating Percy's Python Appium integration.
Python Appium Tutorial
The tutorial assumes you're already familiar with Python and Appium and focuses on using it with Percy. You'll still be able to follow along if you're not familiar with Python and Appium, but we won't spend time introducing Python and Appium concepts.
The tutorial also assumes you have Node 14+ with npm and git installed.
Step 1: Download sample project and upload your app
Clone the example application and install dependencies:
$ git clone https://github.com/percy/example-percy-appium-python.git
$ cd example-percy-appium-python
$ make install
This tutorial specifically uses BrowserStack App Automate to run Appium tests, even though you should be able to follow the tutorial if you are using any other service to run Appium tests or running it locally. For App Percy to work we only need to initialise Percy with the Appium driver object.
In case you are choosing to use BrowserStack App Automate, please follow following steps:
- You will need a BrowserStack
usernameandaccess key. To obtain your access credentials, sign up for a free trial or purchase a plan. - You can get your username and access key from your profile page.
Example Android and iOS apps are provided in the resources/ folder. You can upload them using the following curl command:
$ curl -u "<username>:<access key>" \
  -X POST "https://api-cloud.browserstack.com/app-automate/upload" \
  -F "file=@resources/ios_resources/BStackSampleApp.ipa" # this example is for iOS, for android use resources/android_resources/WikipediaSample.apk
You will get output similar to the below snippet. Keep track of this app URL.
{"app_url":"bs://b3d22f77ac5c4064*****1c470d3728a9b697f"}
You can also refer to this documentation to know more about uploading your app build to App Automate.
Step 2: Create new app project on the Percy dashboard
Sign in to Percy and create a new app project, for example, test-project. After you've created the project, you'll be shown a Percy Access Token. Use it in the next step.
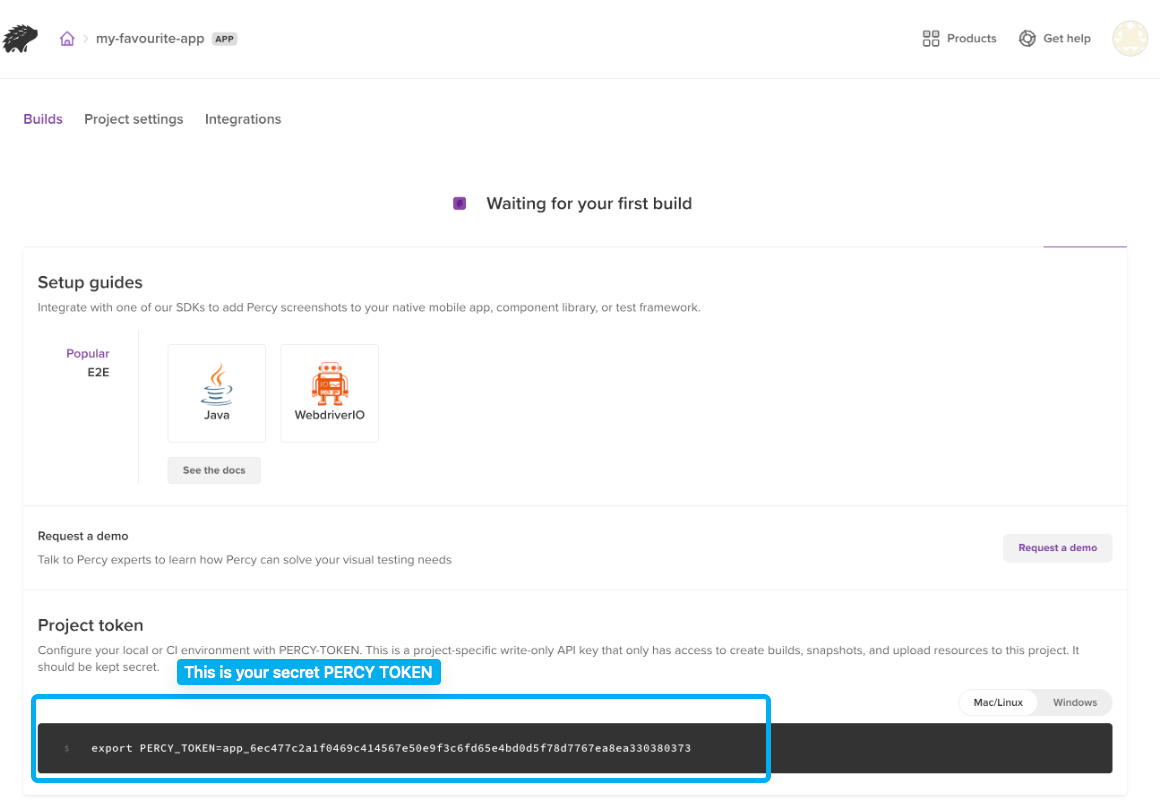
Step 3: Set PERCY_TOKEN
In the shell window you're working in, export the token environment variable:
$ export PERCY_TOKEN="<your token here>"
$ set PERCY_TOKEN="<your token here>"
$ $Env:PERCY_TOKEN="<your token here>"
Note: Usually this would only be set up in your CI environment, but to keep things simple we'll configure it in your local shell so that Percy is enabled in your local environment.
Step 4: Execute the project to create first screenshots of your app
Check out a new branch for your work in this tutorial (we'll call this branch tutorial-example), then run tests & take screenshots:
$ git checkout -b tutorial-example
Since you are using Appium, your Appium capabilities and configuration keys look like the example below. Use your text editor to edit tests/android.py & tests/ios.py to update USER_NAME, ACCESS_KEY and APP URL with Browserstack User name, Access key, and App URL that you received in step 1.
USER_NAME = "App Automate User Name" # set your App Automate username
ACCESS_KEY = "App Automate Access key" # set your App Automate password

pixel_4 = {
  "deviceName": "Google Pixel 4",
  "app": '<APP URL>', # replace app url with the URL you received in step 1
  "appium:percyOptions": {
    "enabled": True # True by default. This can be used to disable visual testing for certain devices
  },
  'bstack:options' : {
    "projectName" : "My Project",
    "buildName" : "test percy_screnshot",
    "sessionName" : "BStack first_test",
    "userName" : USER_NAME, # set your App Automate username
    "accessKey" : ACCESS_KEY # set your App Automate password
  },
  "platformName": "android",
}

capabilities_list = [pixel_4]
session_output = list(map(run_session, capabilities_list))
USER_NAME = "App Automate User Name" # set your App Automate username
ACCESS_KEY = "App Automate Access key" # set your App Automate password

pixel_4 = {
  "deviceName": "iPhone 14",
  "os_version": "16",
  "app": '<APP URL>', # replace app url with the URL you received in step 1
  "appium:percyOptions": {
    "enabled": True # True by default. This can be used to disable visual testing for certain devices
  },
  'bstack:options' : {
    "projectName" : "My Project",
    "buildName" : "test percy_screnshot",
    "sessionName" : "BStack first_test",
    "userName" : USER_NAME, # set your App Automate username
    "accessKey" : ACCESS_KEY # set your App Automate password
  },
  "platformName": "android",
}

capabilities_list = [pixel_4]
session_output = list(map(run_session, capabilities_list))
In general, your Appium Test Script would look like this:
def run_session(capability):
    driver = webdriver.Remote('https://hub-cloud.browserstack.com/wd/hub', capability)
    percy_screenshot(driver, 'screenshot 1') # percy takes a screenshot of the home page

    search_element = WebDriverWait(driver, 30).until(
        EC.element_to_be_clickable((AppiumBy.ACCESSIBILITY_ID, "Search Wikipedia"))
    )
    search_element.click()
    search_input = WebDriverWait(driver, 30).until(
        EC.element_to_be_clickable(
            (AppiumBy.ID, "org.wikipedia.alpha:id/search_src_text")
        )
    )
    search_input.send_keys("BrowserStack")
    time.sleep(2)
    driver.hide_keyboard()
    percy_screenshot(driver, 'screenshot 2') # percy takes a screenshot of the search results

    driver.quit()
Now, it is time to run your tests.
# For Android
$ make test-android
# For iOS
$ make test-ios
This will run the app's Python Appium tests, which contain calls to create Percy screenshots. The screenshots will then be uploaded to Percy for comparison. Percy will use the PERCY_TOKEN you used in Step 2 to know the organization and project. Internally, Percy will use something similar to npx percy:app:exec python ui_tests.py.
You can view the screenshots in Percy now if you want, but there will be no visual comparisons yet, since this is the first time you are running these tests. You'll see that Percy shows you that these screenshots come from your tutorial-example branch.
Step 5: Make some changes on app content to create some visual differences
Now, it's time to introduce some visual changes to your app. Replace the search_input.send_keys in your test script as shown below.
# We are searching for something else before taking the screenshot
search_input.send_keys("BrowserStack again")
# We are searching for something else before taking the screenshot

search_input.send_keys("BrowserStack again")
Step 6: Commit your changes
Create a commit with the changes.
$ git commit -am "Text Changed"
Step 7: Run tests again
Run the tests with screenshots again.
# For Android
$ make test-android
# For iOS
$ make test-ios
This will run the tests again and take new screenshots of our modified application. The new screenshots will be uploaded to Percy and compared with the previous screenshots, showing any visual diffs.
At the end of the test run output, you will see logs from Percy confirming that the screenshots were successfully uploaded. The logs will also give you a direct URL to check out any visual diffs.
Step 8: View Visual Differences on Dashboard
Visit your project in Percy and you'll see a new build with visual comparisons between the two runs. Click anywhere on the Build 2 row (we are assuming here that you are using a new project to test things out). You can see the original screenshots on the left, and the new screenshots on the right.
Percy has highlighted what's changed visually in the app! Screenshots with the largest changes are shown first You can click on the highlight to reveal the underlying screenshot.
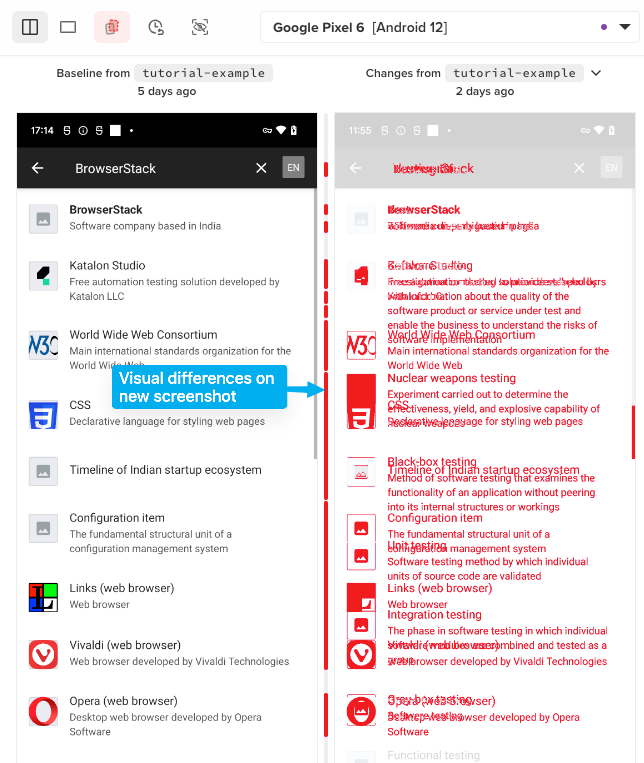
If you scroll down, you'll see that no other test cases were impacted by our changes to text. The unchanged screenshots are shown under an Unchanged filter and are hidden by default.
Finished! 😀
From here, you can try making your own changes to the app and tests, if you like. If you do, re-run the tests and you'll see any visual changes reflected in Percy.
Updated 5 months ago
View how Percy selects baselines for comparisons, or view detailed SDK documentation.